---
title: How to Set Up Custom HTML CTAs in Vidalytics
description: In this article we go over the step by step process on how to set up your custom HTML CTAs
---
[Skip to content](https://help.vidalytics.com/how-to-set-up-custom-html-ctas-in-vidalytics#main-content)
English
Show submenu for translations

Open main navigation
Close main navigation
- English
Show submenu for translations
- Contact us
Contact us
How can we help you?
- There are no suggestions because the search field is empty.
1. [Vidalytics Knowledge Center](https://help.vidalytics.com/?hsLang=en)
2. [Conversion & Engagement Tools](https://help.vidalytics.com/conversion-engagement-tools?hsLang=en)
3. [CTAs](https://help.vidalytics.com/conversion-engagement-tools?hsLang=en#ctas)
# How to Set Up Custom HTML CTAs in Vidalytics
## In this article we go over the step by step process on how to set up your custom HTML CTAs
Custom HTML Call To Actions is a feature that allows you to show a specific section of your site timed to a specific moment on your video. A Call to Action (CTA) is a clickable element or prompt embedded within your video to guide viewers towards the next steps. CTAs can include buttons, links, or custom HTML content.
You can use your own custom HTML elements as CTAs (or simply timed content) and tie them to video watch time inside of Vidalytics to choose when you want to reveal them to your viewers.
As you already know, by using Vidalytics' built-in CTAs, you get to display your call to action buttons based on the time on your video and not on the time on page, which is way more powerful when you're trying to create a particular experience for the viewer.
Now you can do the same with your own HTML elements. They can be buttons, forms, order boxes, or anything else you can think of.
#### **How to Setup:**
**1. Access your Video Settings:** Access your video library and select the video in question, click Edit and this will take you to your Video Settings.
**2. Access your Marketing Settings:** Locate the Marketing Settings tab on the top right corner and click to open Marketing Settings.
**3. Create your Call to Action:** Click on *"+ Create New CTA".* This will Create a Call to Action on your video and open the CTA Settings.
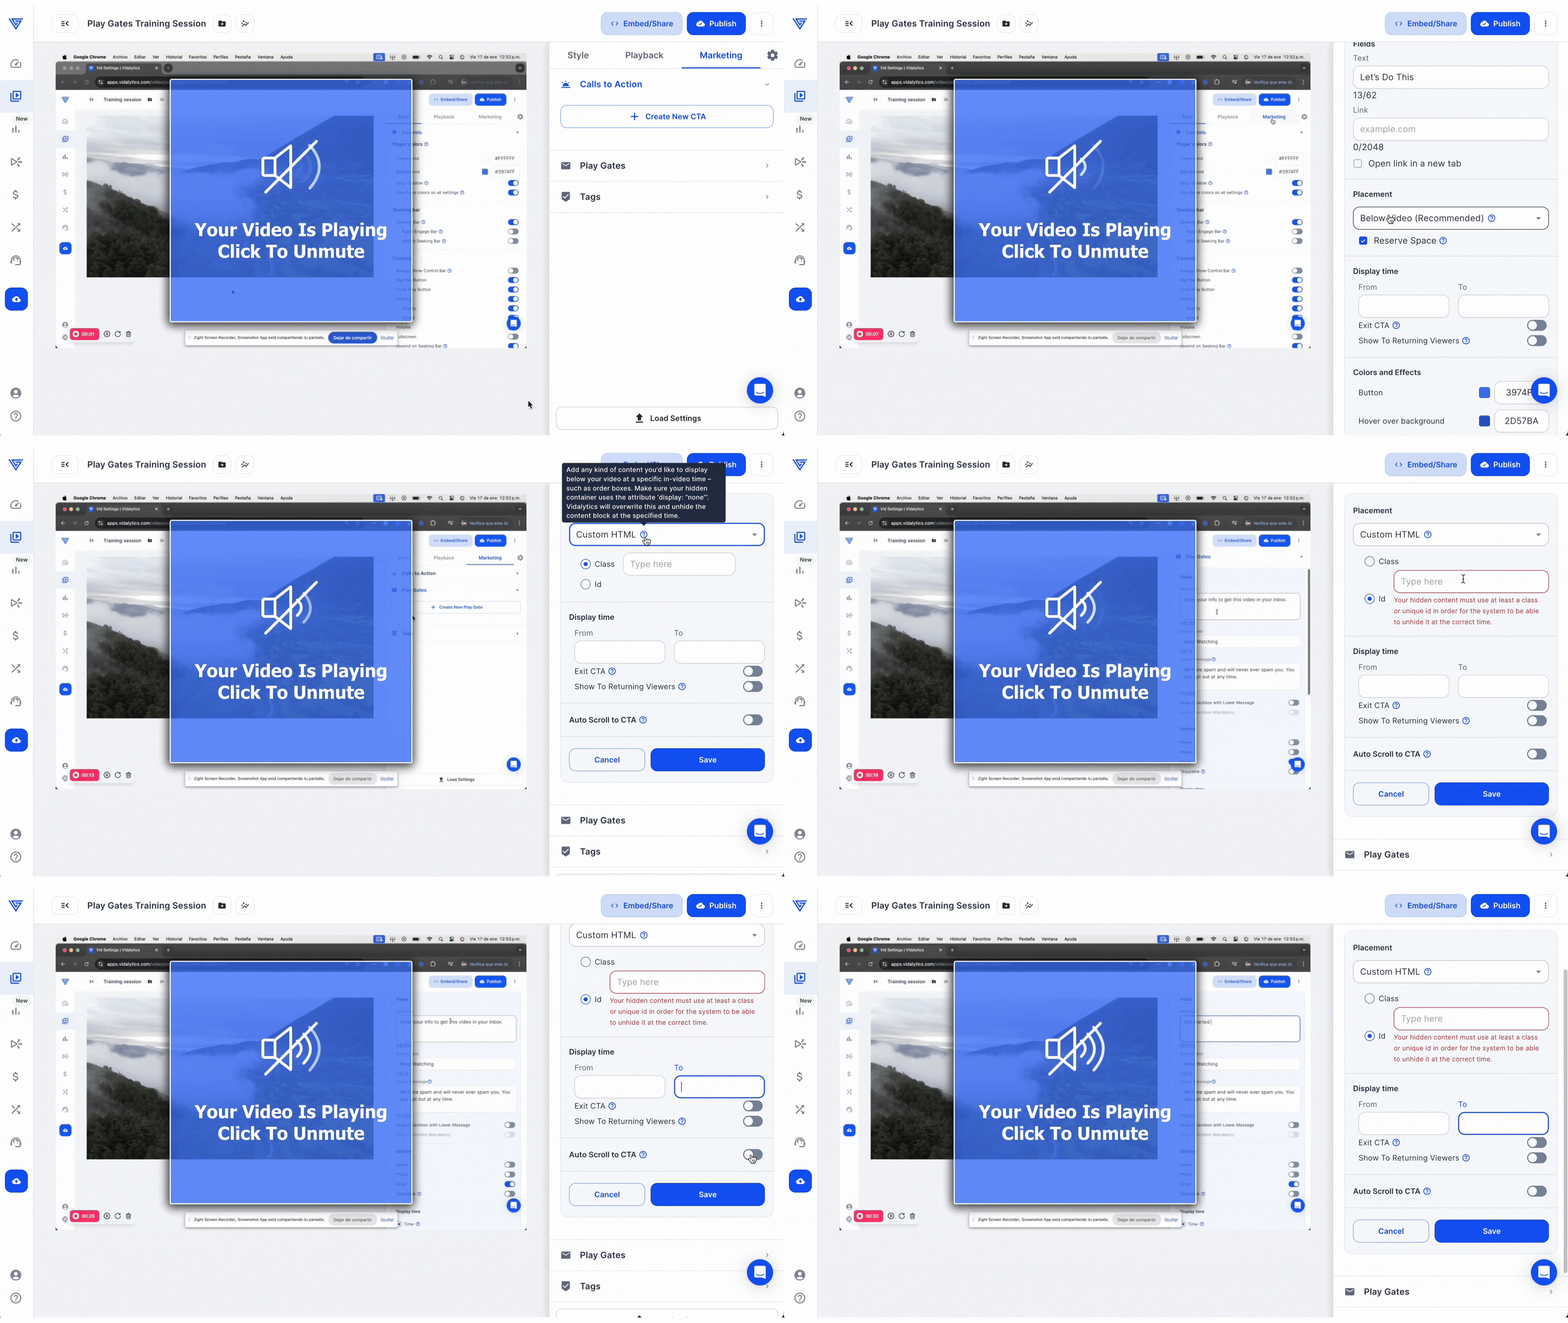
**4. Set up your Custom HTML CTA:** Select the Placement to be "Custom HTML". This will open the Custom HTML options for you to set on your CTA. **Enter the same 'class' or 'id' that you have given your timed content on your site. This is very important!** They need to match exactly so Vidalytics can identify it and display it at the correct time.
**Note:** make sure your hidden element / container has the attribute 'display:none'. This way, Vidalytics can unhide it only at the time you specify 💪
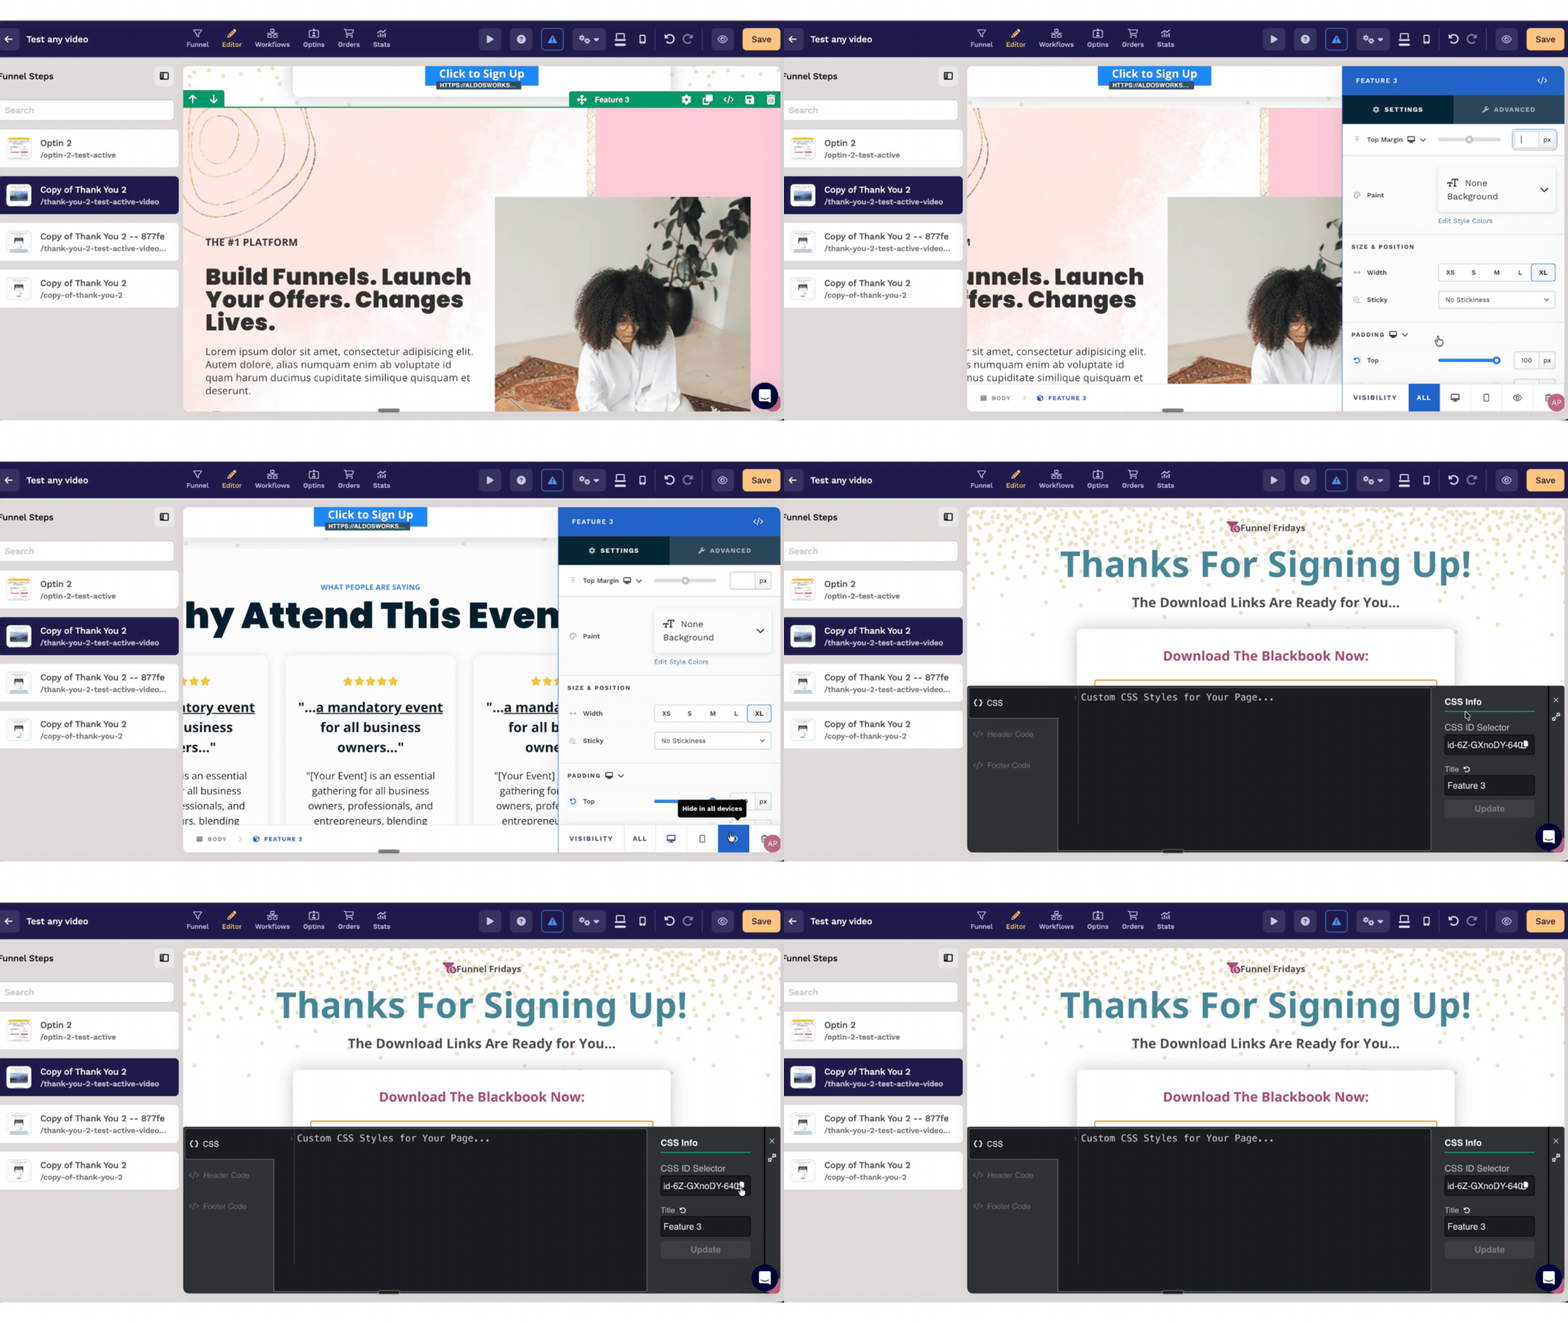
Below you can see an example using Clickfunnels. Hiding a Section and getting the ID to paste directly in Vidalytics.
Go to your video settings and set the CTA to Custom HTML. Paste the ID or Class and complete the setup.
[](https://downloads.intercomcdn.com/i/o/i6av6kys/1389854560/82badc44ab72aed4a36a9cb7c67e/Custom+HTML+CTA+KB.gif?expires=1778631300&signature=8ed5e1a7605a5c45be9021596d3fd996b70de20bcac135ca3349421c775c22be&req=dSMvH8F7mYRZWfMW1HO4zU6%2BWvkEQcpaDrf%2FdO%2BaaRO16O436Z9qJ6n7qezi%0ALy4xpfU9xCwHlMkiN3s%3D%0A)
#### **Additional Settings and Options:**
**Exit CTA:**
choose if you want to show this content at a specific time or upon video pause (Exit).
**Returning Viewers:**
Lastly, choose if you want this content to be shown to returning viewers automatically or not, and hit Save.
**Note:** Remember to **Publish** your video once you're done with the changes, and you'll be able to see them in action on your site 😉
---
For additional questions, feedback or assistance please feel free to reach out directly to our Customer Happiness Team at **[hi@vidalytics.com](mailto:hi@vidalytics.com).**
- [Account Management & Billing](https://help.vidalytics.com/account-management-billing?hsLang=en#main-content)
- [Account Management](https://help.vidalytics.com/account-management-billing?hsLang=en#account-management)
- [Billing](https://help.vidalytics.com/account-management-billing?hsLang=en#billing)
- [Bandwidth](https://help.vidalytics.com/account-management-billing?hsLang=en#bandwidth)
- [Team & Users](https://help.vidalytics.com/account-management-billing?hsLang=en#team-users)
- [Plans & Upgrades](https://help.vidalytics.com/account-management-billing?hsLang=en#plans-upgrades)
- [Affiliates](https://help.vidalytics.com/affiliates?hsLang=en)
- [Video Management](https://help.vidalytics.com/video-management?hsLang=en#main-content)
- [Uploading](https://help.vidalytics.com/video-management?hsLang=en#uploading)
- [Video Management](https://help.vidalytics.com/video-management?hsLang=en#video-management)
- [Integrations & Embedding](https://help.vidalytics.com/integrations-embedding?hsLang=en#main-content)
- [Landing Page Builders](https://help.vidalytics.com/integrations-embedding?hsLang=en#landing-page-builders)
- [CRM & Email Integrations](https://help.vidalytics.com/integrations-embedding?hsLang=en#crm-email-integrations)
- [Automations](https://help.vidalytics.com/integrations-embedding?hsLang=en#automations)
- [E-commerce](https://help.vidalytics.com/integrations-embedding?hsLang=en#e-commerce)
- [Tagging & Tracking](https://help.vidalytics.com/tagging-tracking?hsLang=en#main-content)
- [Tagging Basics](https://help.vidalytics.com/tagging-tracking?hsLang=en#tagging-basics)
- [Conversion Tracking](https://help.vidalytics.com/tagging-tracking?hsLang=en#conversion-tracking)
- [Zapier & Automation](https://help.vidalytics.com/tagging-tracking?hsLang=en#zapier-automation)
- [Troubleshooting](https://help.vidalytics.com/troubleshooting?hsLang=en#main-content)
- [Embedding Issues](https://help.vidalytics.com/troubleshooting?hsLang=en#embedding-issues)
- [General Troubleshooting](https://help.vidalytics.com/troubleshooting?hsLang=en#general-troubleshooting)
- [Analytics & Metrics](https://help.vidalytics.com/analytics-metrics?hsLang=en#main-content)
- [Understanding Your Data](https://help.vidalytics.com/analytics-metrics?hsLang=en#understanding-your-data)
- [Dashboard](https://help.vidalytics.com/analytics-metrics?hsLang=en#dashboard)
- [Vids Stats](https://help.vidalytics.com/analytics-metrics?hsLang=en#vids-stats)
- [Player & Display Settings](https://help.vidalytics.com/player-display-settings?hsLang=en#main-content)
- [Player Setup](https://help.vidalytics.com/player-display-settings?hsLang=en#player-setup)
- [Playback & Behavior](https://help.vidalytics.com/player-display-settings?hsLang=en#playback-behavior)
- [Player Features](https://help.vidalytics.com/player-display-settings?hsLang=en#player-features)
- [Advanced & Developer](https://help.vidalytics.com/player-display-settings?hsLang=en#advanced-developer)
- [Captions](https://help.vidalytics.com/player-display-settings?hsLang=en#captions)
- [Thumbnails](https://help.vidalytics.com/player-display-settings?hsLang=en#thumbnails)
- [Vids AI](https://help.vidalytics.com/vids-ai?hsLang=en#main-content)
- [AI features](https://help.vidalytics.com/vids-ai?hsLang=en#ai-features)
- [Agencies](https://help.vidalytics.com/agencies?hsLang=en#main-content)
- [Account Management](https://help.vidalytics.com/agencies?hsLang=en#account-management)
- [Experiments & Split Testing](https://help.vidalytics.com/experiments-split-testing?hsLang=en#main-content)
- [Setup & How-To](https://help.vidalytics.com/experiments-split-testing?hsLang=en#setup-how-to)
- [Reference & FAQs](https://help.vidalytics.com/experiments-split-testing?hsLang=en#reference-faqs)
- [Conversion & Engagement Tools](https://help.vidalytics.com/conversion-engagement-tools?hsLang=en#main-content)
- [CTAs](https://help.vidalytics.com/conversion-engagement-tools?hsLang=en#ctas)
- [Engagement Features](https://help.vidalytics.com/conversion-engagement-tools?hsLang=en#engagement-features)
- [Thumbnails & Visual](https://help.vidalytics.com/conversion-engagement-tools?hsLang=en#thumbnails-visual)
- [Getting Started](https://help.vidalytics.com/getting-started?hsLang=en#main-content)
- [Platform Basics](https://help.vidalytics.com/getting-started?hsLang=en#platform-basics)
- [Platform Reliability](https://help.vidalytics.com/getting-started?hsLang=en#platform-reliability)
- [Smart Vids](https://help.vidalytics.com/smart-vids?hsLang=en#main-content)
- [Setup & Configuration](https://help.vidalytics.com/smart-vids?hsLang=en#setup-configuration)
- [Advanced Features](https://help.vidalytics.com/smart-vids?hsLang=en#advanced-features)
- [Tagging & Data](https://help.vidalytics.com/smart-vids?hsLang=en#tagging-data)
[](https://help.vidalytics.com/?hsLang=en)
[mailto:hi@vidalytics.com](mailto:hi@vidalytics.com)
Copyright © 2026, Vidalytics Inc